GIMP - GNU Image Manipulation Program
GIMP is an open source substitute for Adobe Photoshop, and is what you should use to make a ChiPy T-shirt design!
 |
≈ |
GIMP introduction
- Get GIMP: follow the installation according to your OS
- Open a file:
Gimp → File → Open → '<filename>.<ext>' - Use the GUI ... apparently it's like Adobe Photoshop ... (startup GIMP for demo now)
I'll repeat myself in the GUI and shell
GIMP Concepts demo
First you open an image to edit. The GUI tools include pencils and paintbrushes with various patterns and selection tools.
Drawables
- Layers: different images / copies of images overlaid with transparency
- Channels: different sets of visible colors or selections -- like a saved mask
- Selections: a collection of pixels that is currently active
- Tile Object: a 64x64 region of pixels being edited -- tiling is done to save memory
- Pixel Region: a user-defined rectangle of pixels in memory (can be bigger than a tile)
GIMP GUI demo
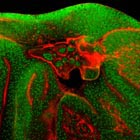
A pair of colorblind Japanese scientists have a great page on data presentation for colorblind people. Two of my past 5 supervisors, and 1 in 3 males, are colorblind.
What they see is:

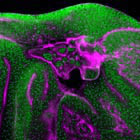
What they ask readers to create is:
 |
→ |  |
Channels → change colors → save to file
- Open the file
- Windows → Dockable Dialogs → Channels
Select the red one and copy it to the blue one
- Highlight only the Red component
- [Control] + [Click] → Channel to Selection
- Edit → Copy
- Highlight only the Blue component
- Tools → Color Tools → Colorize ... Choose the maximum Hue, Saturation, Lightness
File → Export As ...
Aside (Wait ... what about Inkscape?)
| ≈ | ||
Inkscape is open source too, and a substitute for Adobe Illustrator. It's a vector graphics program that uses Scalable Vector Graphics (SVG) as its native format. GIMP is a bitmap program...you manipulate pixels not shapes / vector descriptions.
GIMP should be called:
Greatest ever Image Manipulation Program
... Because it's extensible via Python!!!
I can't quite tell who is responsible for writing the library. James Henstridge, from Australia, for sure wrote the documentation and a bunch of examples.
Scikit - Image
A few weeks ago, there was talk on the listserv about Scikit-Image and how it was used to make (I think) the composite of Pluto. I hadn't heard of it until then.
If someone who knows Scikit-Image can comment about similarities, difference, and tradeoffs after I'm done that would be kind of cool.
The GIMP Python API
- GIMP ships with Python:
- Filters → Python-fu → Console
- on my mac the executable is at:
/Applications/GIMP.app/Contents/MacOS/python - with libraries at:
/Applications/GIMP.app/Contents/Resources/lib/python2.7
- gimpfu is a set of Python modules that wrap the C library
libgimp - There are two major parts:
gimpfu.pdb, the Procedural Database, wraps all of the registered functionsgimpfu.gimpcontains convenience objects for more powerful manipulation
Links:
The Python-specific API | Example scripts | The Procedural Database
Gimpfu of the colorblind thing again
# See what was imported already
#   (run during window startup:  from gimpfu import *)
print '\n'.join(obj for obj in dir())

# Exclude the enums.
print '\n'.join(
        obj for obj in dir()
        if not obj.startswith('__') and
        not obj == obj.upper())

# What's the path?
gimp.__file__

import sys
sys.executable
... In the Python-Fu console:
Copy the red channel into the clipboard, paste it into the blue channel, and save
# Copy the red channel
red = pdb.gimp_channel_new_from_component(img, RED_CHANNEL, 'red')
img.add_channel(red)
pdb.gimp_edit_copy(red)

# Turn off everything but the blue channel
pdb.gimp_image_set_component_active(img, RED_CHANNEL, False)
pdb.gimp_image_set_component_active(img, GREEN_CHANNEL, False)
pdb.gimp_image_set_component_active(img, BLUE_CHANNEL, True)

# Paste the image into a layer (there is only one layer right now)
lyr = pdb.gimp_edit_paste(img.layers[0], True)
pdb.gimp_floating_sel_anchor(lyr)

# Save
new_filename = "fixed2".join(img.filename.split('colorblind'))
pdb.gimp_file_save(img, img.layers[0], new_filename, new_filename)
Making the code a GIMP plugin
The GIMP plugin documentation for Python is old. The GIMP Python docs was last updated in 2006. The most detailed resource I've found is Frédéric Jaume's tutorial, made in 2011; he's also made recent comments about updating the site, but it is a little wrong sometimes.
Or just copy what was shipped with your GIMP:
For the most up-to-date definition of the plugin registration function, open the Python-Fu console, type import gimpfu, and then use help(gimpfu) or help(gimpfu.register).
To find where to put the files:
GIMP → Preferences (will open a window) → Folders → Plug-ins
One folder is for system plug-ins, the other for user plug-ins:
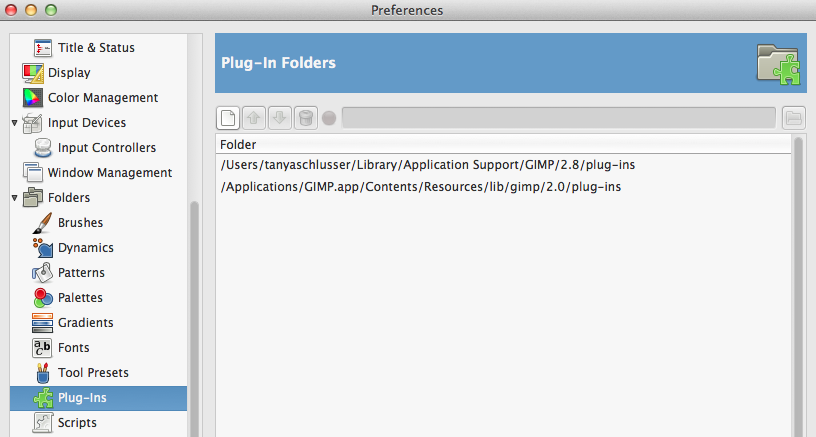
... The code itself is just Python
The from gimpfu import * gives you all of the constants, the procedural database (pdb), and gimp... then everything else is just Python:
#!/usr/bin/env python
# -*- coding: utf-8 -*-
from gimpfu import *
import os

def red_to_magenta(img):
    # Create a new image window
    gimp.Display(img)
    # Show the new image window
    gimp.displays_flush()
    gimp.context_push()
    img.undo_group_start()
    red = pdb.gimp_channel_new_from_component(
            img, RED_CHANNEL, 'red')
    img.add_channel(red)
    pdb.gimp_edit_copy(red)

    pdb.gimp_image_set_component_active(
            img, RED_CHANNEL, False)
    pdb.gimp_image_set_component_active(
            img, GREEN_CHANNEL, False)
    pdb.gimp_image_set_component_active(
            img, BLUE_CHANNEL, True)

    lyr = pdb.gimp_edit_paste(
            img.layers[0], True)
    pdb.gimp_floating_sel_anchor(lyr)
    img.remove_channel(red)
    img.undo_group_end()
    gimp.context_pop()
... then register the script, and call main()
There are 12 arguments to the register function. Frédéric Jaume's blog describes them best. Here's an example:
register(
    'python-fu-red-to-magenta',
    'Red to magenta for colorblind people.',
    'Add the red channel to the blue one.',
    'Tanya Schlusser',     # author
    'public domain',       # copyright
    '2015',                # date
    '_Red to magenta...',  # menu_path
    'RGB*',                # image_types
    [
     (PF_IMAGE, 'img', 'Input image', None)
    ],   # Arg type, name, description, default
    [],  # Return values
    red_to_magenta,  # Function to call
    menu="<Image>/Filters/Artistic/"
    )


main()
... and on the command line
Modify the code to take an input file name and output file name. The important changes are:
register(
    'python-fu-red-to-magenta-batch',
    # Different function name, of course...
    # [... skip the description, etc. ...]
    #
    '',  # The 'RGB*' becomes an empty string, meaning
         # this function does not operate on an image.
    [
     (PF_FILE, "infile", "Path for input file", ""),
     (PF_DIRNAME, "save-path", "Path for output filename", ""),
     (PF_STRING, "filename",  "Filename for export",  "")
    ],
    # [... skip the rest ... ]
    )
The function call looks like:
$ /Applications/GIMP.app/Contents/MacOS/GIMP  \
>  --no-interface  \
>  --batch='(python-fu-red-to-magenta-batch  \
>            RUN-NONINTERACTIVE  \
>            "img/colorblind_fluorescent.jpg"  \
>            "out"  \
>            "fixed3.jpg")'  \
>  --batch='(gimp-quit 0)'
Python's glob standard library beat the glob libraries in GIMP
So, just take an input directory and output directory...
register(
    'python-fu-red-to-magenta-glob',
    #
    # [... skip everything else that's the same ...]
    #
    [
     (PF_STRING, "in-path", "Path for input file", ""),
     (PF_DIRNAME, "save-path", "Path for output filename", "")
    ],
    # [... skip the rest ... ]
    )
The function call looks like:
$ /Applications/GIMP.app/Contents/MacOS/GIMP  \
>  --no-interface  \
>  --batch='(python-fu-red-to-magenta-glob  \
>            RUN-NONINTERACTIVE  \
>            "img/*.jpg"  \
>            "out")'  \
>  -batch='(gimp-quit 0)'
![]()
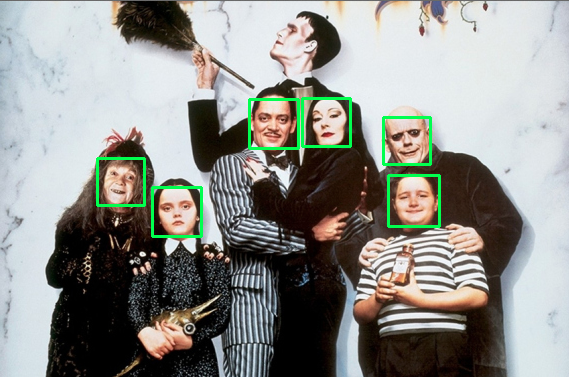
Face detection
OpenCV (Open Computer Vision) is a C / C++ project with computer vision tools. It has Python bindings. If you don't want to compile it yourself, use Anaconda:
$ cat << EOF > requirements.txt
> opencv==2.4.8
> ipython-notebook
> EOF
$
$ conda create -n with_opencv python=2.7 --file=requirements.txt
$ source activate with_opencv
$ # source deactivate with_opencv  # (when you're done)
Or just download the correct binaries, untar and unzip, and put everything where it is supposed to be yourself...

import cv2
import numpy as np
haarcascades = cv2.__file__.split('lib')[0] + 'share/OpenCV/haarcascades/'
cascade_fn =  haarcascades + "haarcascade_frontalface_alt.xml"
cascade = cv2.CascadeClassifier(cascade_fn)


def detect(img, cascade, minSize=(20,20)):
    rects = cascade.detectMultiScale(
            img,
            scaleFactor=1.05,
            minNeighbors=4,
            minSize=minSize,
            flags = cv2.CASCADE_SCALE_IMAGE)
    if len(rects) == 0:
        return []
    rects[:,2:] += rects[:,:2]
    return rects


def draw_rects(img, rects, color):
    for x1, y1, x2, y2 in rects:
        cv2.rectangle(img, (x1, y1), (x2, y2), color, 2)
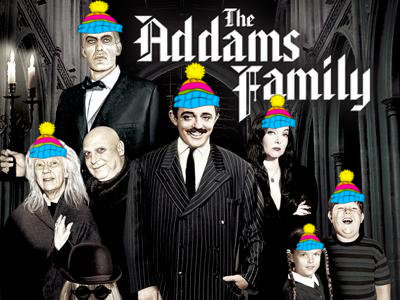
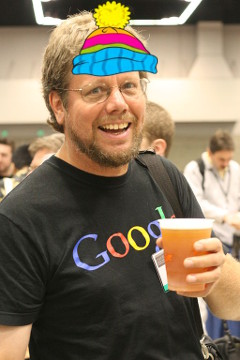
img = cv2.imread('img/addams_family_2.jpg')

gray = cv2.cvtColor(img, cv2.COLOR_BGR2GRAY)
gray = cv2.equalizeHist(gray)

rects = detect(gray, cascade)
vis = img.copy()
draw_rects(vis, rects, (0, 255, 0))
cv2.imshow("facedetect", vis)
cv2.waitKey(0)
cv2.destroyAllWindows()
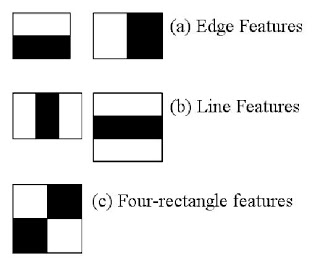
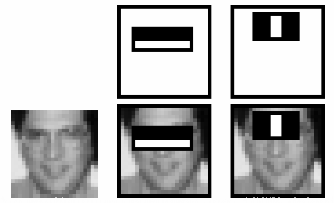
The model is a cascade made of Haar features
Basically it's a tree.
- Each node in the tree tests for a feature and position.
- The model was trained on 160000+ features and selected 6000.
- It quits as soon as a test fails, which is why this can be fast.
- The algorithm was the first one ever used in demonstrating real-time face detection.
- The code for real-time video detection, in Python, is included in the OpenCV examples. The code I just showed was adapted from this tutorial.
 |
 |
Connecting OpenCV + GIMP
The Python in my GIMP is 2.7...so the libraries I just used for face detection should (hopefully) not break.
Quick hack
Append the extra locations in the Anaconda virtual environment to sys.path from GIMP's Python:
import sys

sys.path.extend([
    '//anaconda/envs/with_opencv/lib/python27.zip',
    '//anaconda/envs/with_opencv/lib/python2.7',
    '//anaconda/envs/with_opencv/lib/python2.7/plat-darwin',
    '//anaconda/envs/with_opencv/lib/python2.7/plat-mac',
    '//anaconda/envs/with_opencv/lib/python2.7/plat-mac/lib-scriptpackages',
    '//anaconda/envs/with_opencv/lib/python2.7/lib-tk',
    '//anaconda/envs/with_opencv/lib/python2.7/lib-old',
    '//anaconda/envs/with_opencv/lib/python2.7/lib-dynload',
    '//anaconda/envs/with_opencv/lib/python2.7/site-packages',
    '//anaconda/envs/with_opencv/lib/python2.7/site-packages/setuptools-18.3.2-py2.7.egg'
])
And related to last month...
Eigenvector decomposition (Principal Components Analysis) can be used in face (or object) recognition. A sample implementation exists in some OpenCV face recognition sample code which I converted to Python. It's in the file:
opencv_facerec.pyThere are other algorithms too, besides the Principal Components (Eigenvector) method:
print "\n".join(f for f in dir(cv2) if 'face' in f.lower())
Data
Data are from the AT&T research lab. The tutorial says this is the easiest one to use:
URL=http://www.cl.cam.ac.uk/research
URL=${URL}/dtg/attarchive/pub/data/att_faces.tar.Z
curl --compressed ${URL} | tar xzvf -###
# Read the data
#
import glob
import random
att_dataset = glob.glob('orl_faces/s*/*.pgm')
is_color = False
pairs = []
for fname in att_dataset:
img = cv2.imread(fname, is_color)
label = fname.split('/')[1].strip('s')
pairs.append([img, label])
principal_components = 8
ntest = 10
random.shuffle(pairs)
train_img, train_label = zip(*pairs[:-ntest])
train_label = np.array(train_label, dtype=np.int32)

model = cv2.createEigenFaceRecognizer(principal_components)
model.train(train_img, train_label)

for img, label in pairs[-ntest:]:
    # Need to make the image one big long row
    flattened_img = img.reshape(img.size)
    prediction, confidence = model.predict(flattened_img)
    print "Predicted: {:>2d}\tactual: {:>2}\tdistance: {:>4}".format(
            prediction, label, int(confidence))
Here's a look at the eigenvectors
This code is in opencv_show_eigenfaces.py
- Preallocate space...and set up to double the image size (for this talk)
- Then show the plots
def rescale(img):
    ## the None is a pointer to the destination matrix (useful if in C).
    return cv2.normalize(img, None, 0, 255, cv2.NORM_MINMAX, cv2.CV_8UC1)


# Prepare a 3 x 5 array of images
height, width = img.shape
nrow, ncol = 3, 5
scale = 2  # To make it big enough for projection onscreen
imgarray = np.zeros((height * nrow, width * ncol), dtype=np.uint8)
big_img = np.zeros((height * nrow * scale, width * ncol * scale), dtype=np.uint8)
# Show eigenvectors of the face recognition model.
model = cv2.createEigenFaceRecognizer()  # empty ==> All the principal components
model.train(train_img, train_label)
W = model.getMat('eigenvectors')
mean = model.getMat('mean')

for i in range(nrow * ncol):
    row = (i / ncol) * height
    col = (i % ncol) * width
    eigenvector = W[:,i]
    # unflatten the vector
    eigen_img = eigenvector.reshape(img.shape)
    imgarray[row:(row+height), col:(col+width)] = rescale(eigen_img)

big_img[:,:] = np.kron(imgarray, [[1,1],[1,1]])
colorized_img = cv2.applyColorMap(big_img, cv2.COLORMAP_JET)
cv2.imshow("eigenfaces", colorized_img)
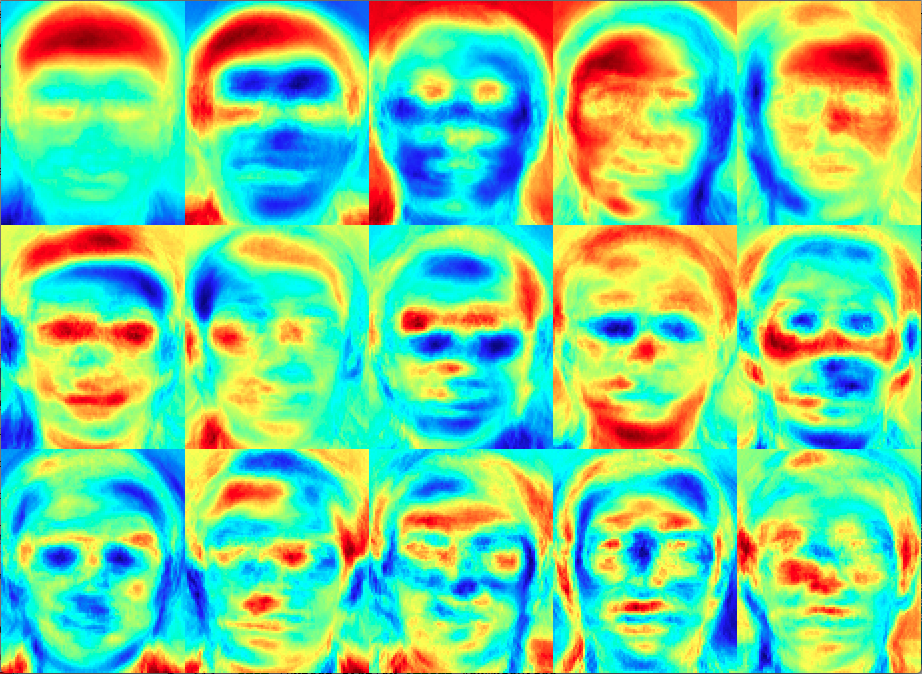
The outcome: the first 15 principal components
The colors are rescaled. Green is the middle and dark red / dark blue both mean intensity -- so people are most different along their hair and forehead, then ...
# Show the array of various projections of the same face.
components = range(25, 400, 25)
for i in range(nrow * ncol):
    row = (i / ncol) * height
    col = (i % ncol) * width
    eigenvectors = W[ :,:components[i] ]
    data = img.reshape((1, img.size))
    projections = cv2.PCAProject(data, mean, eigenvectors.transpose())
    proj_img = projections.dot(eigenvectors.transpose())
    proj_img = proj_img.reshape(img.shape)
    imgarray[row:(row+height), col:(col+width)] = rescale(proj_img)

big_img[:,:] = np.kron(imgarray, [[1,1],[1,1]])
cv2.imshow(
        "projections -- {} to {}".format(components[0], components[-1]),
        big_img)
cv2.waitKey(0)
cv2.destroyAllWindows()
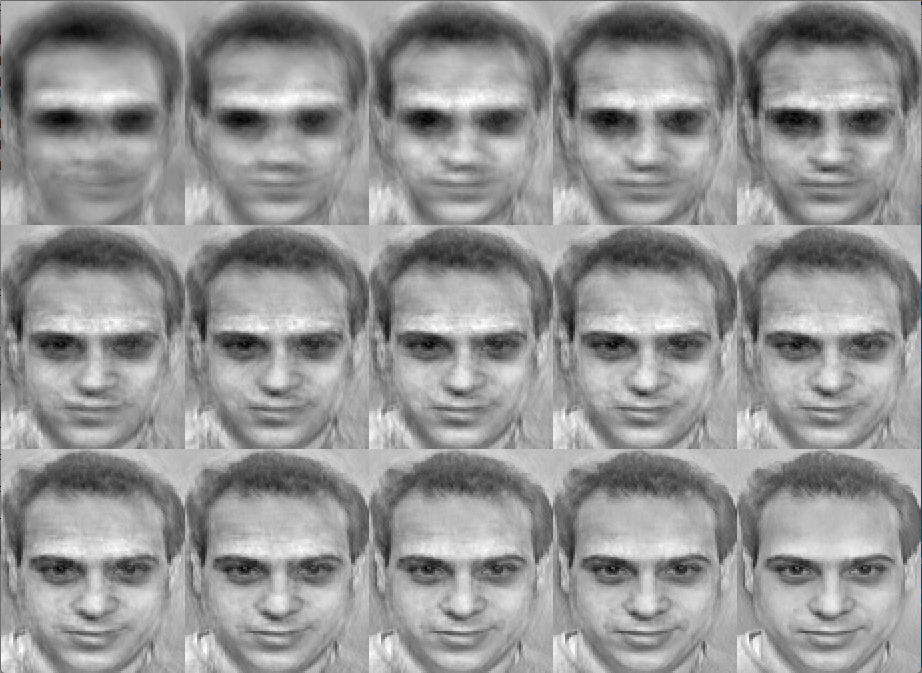
The outcome: one face rendered with different numbers of principal components
- The model we made was right almost all the time with only 8 principal components.
- The images are evenly spaced in increments of 25 principal components.
from IPython.display import YouTubeVideo
YouTubeVideo("2DxWIxec6yo")